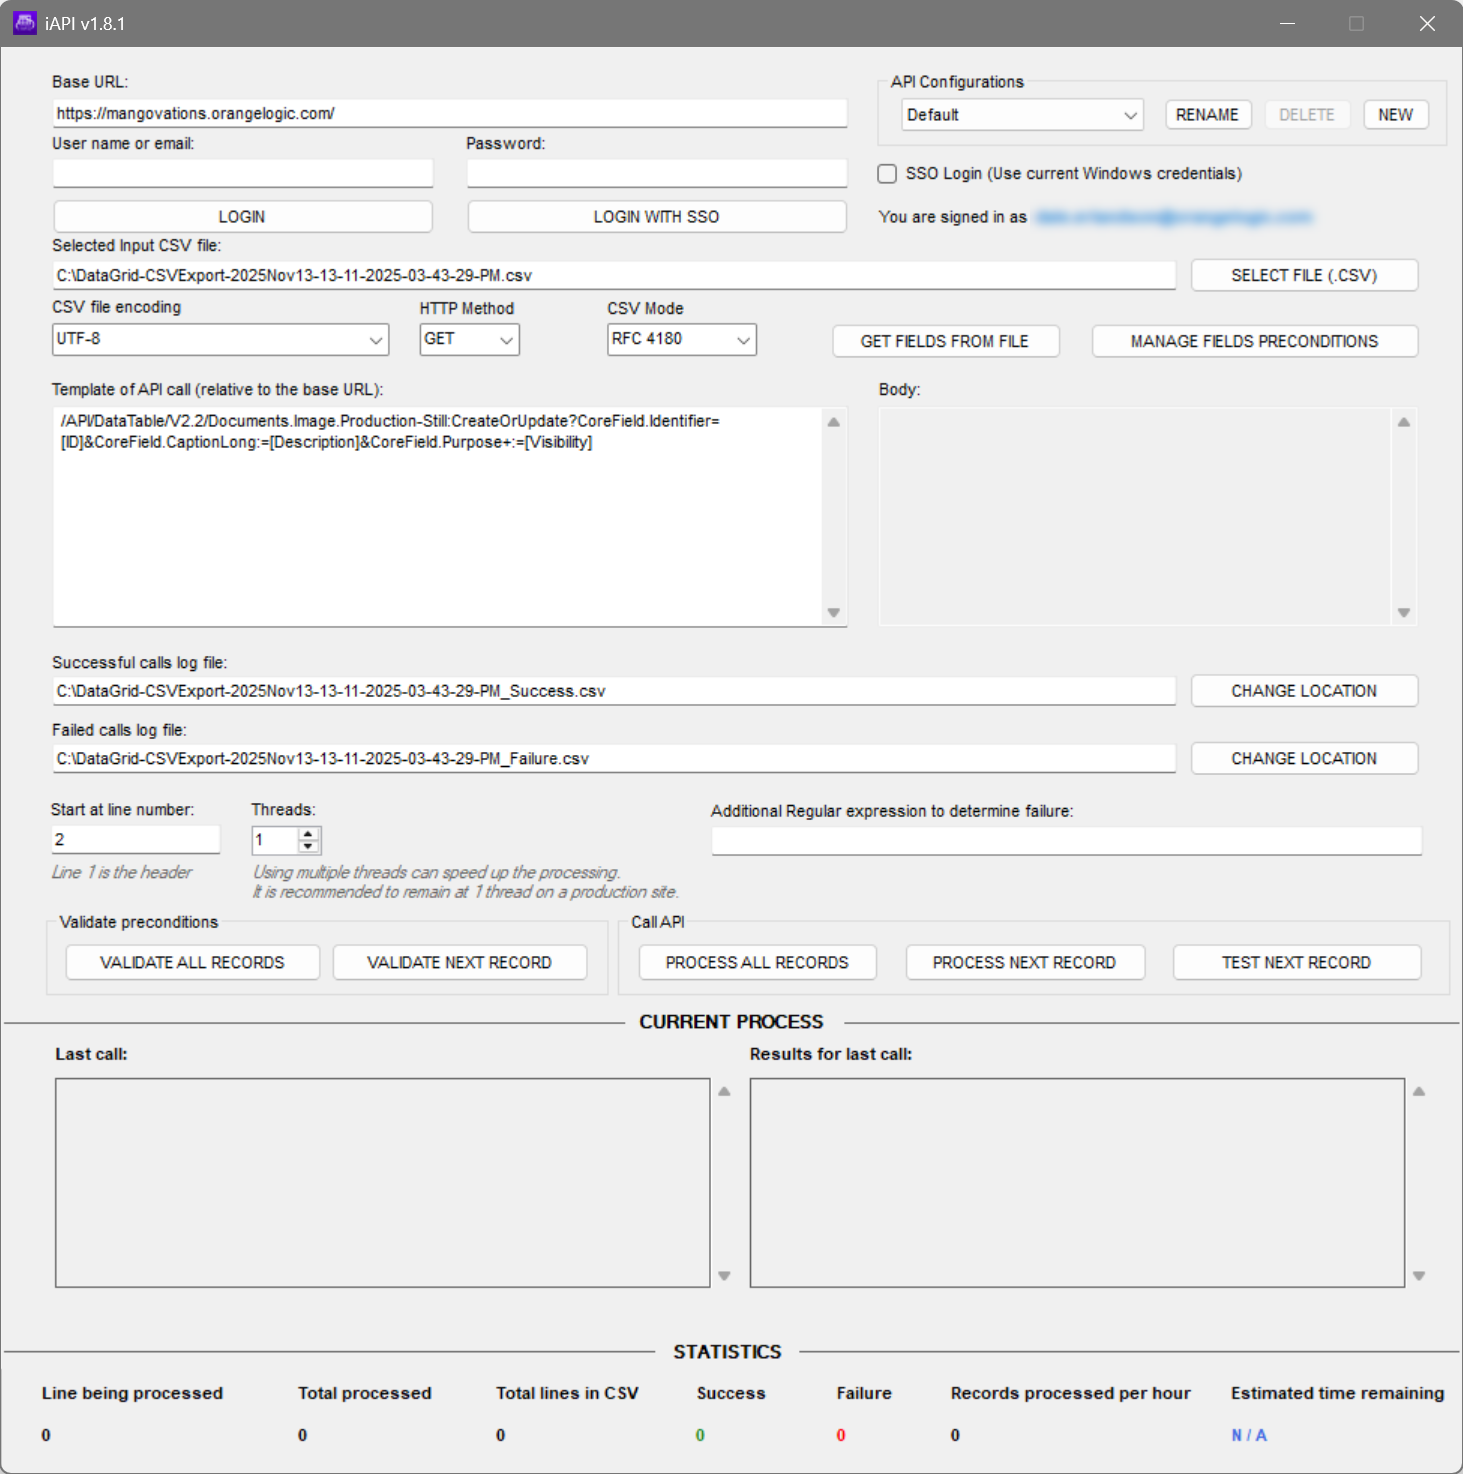
Open the iAPI application. Then, use the fields described below to run API calls based on the data you provide in a CSV file.
iAPI application user interface - Some text intentionally blurred
💭
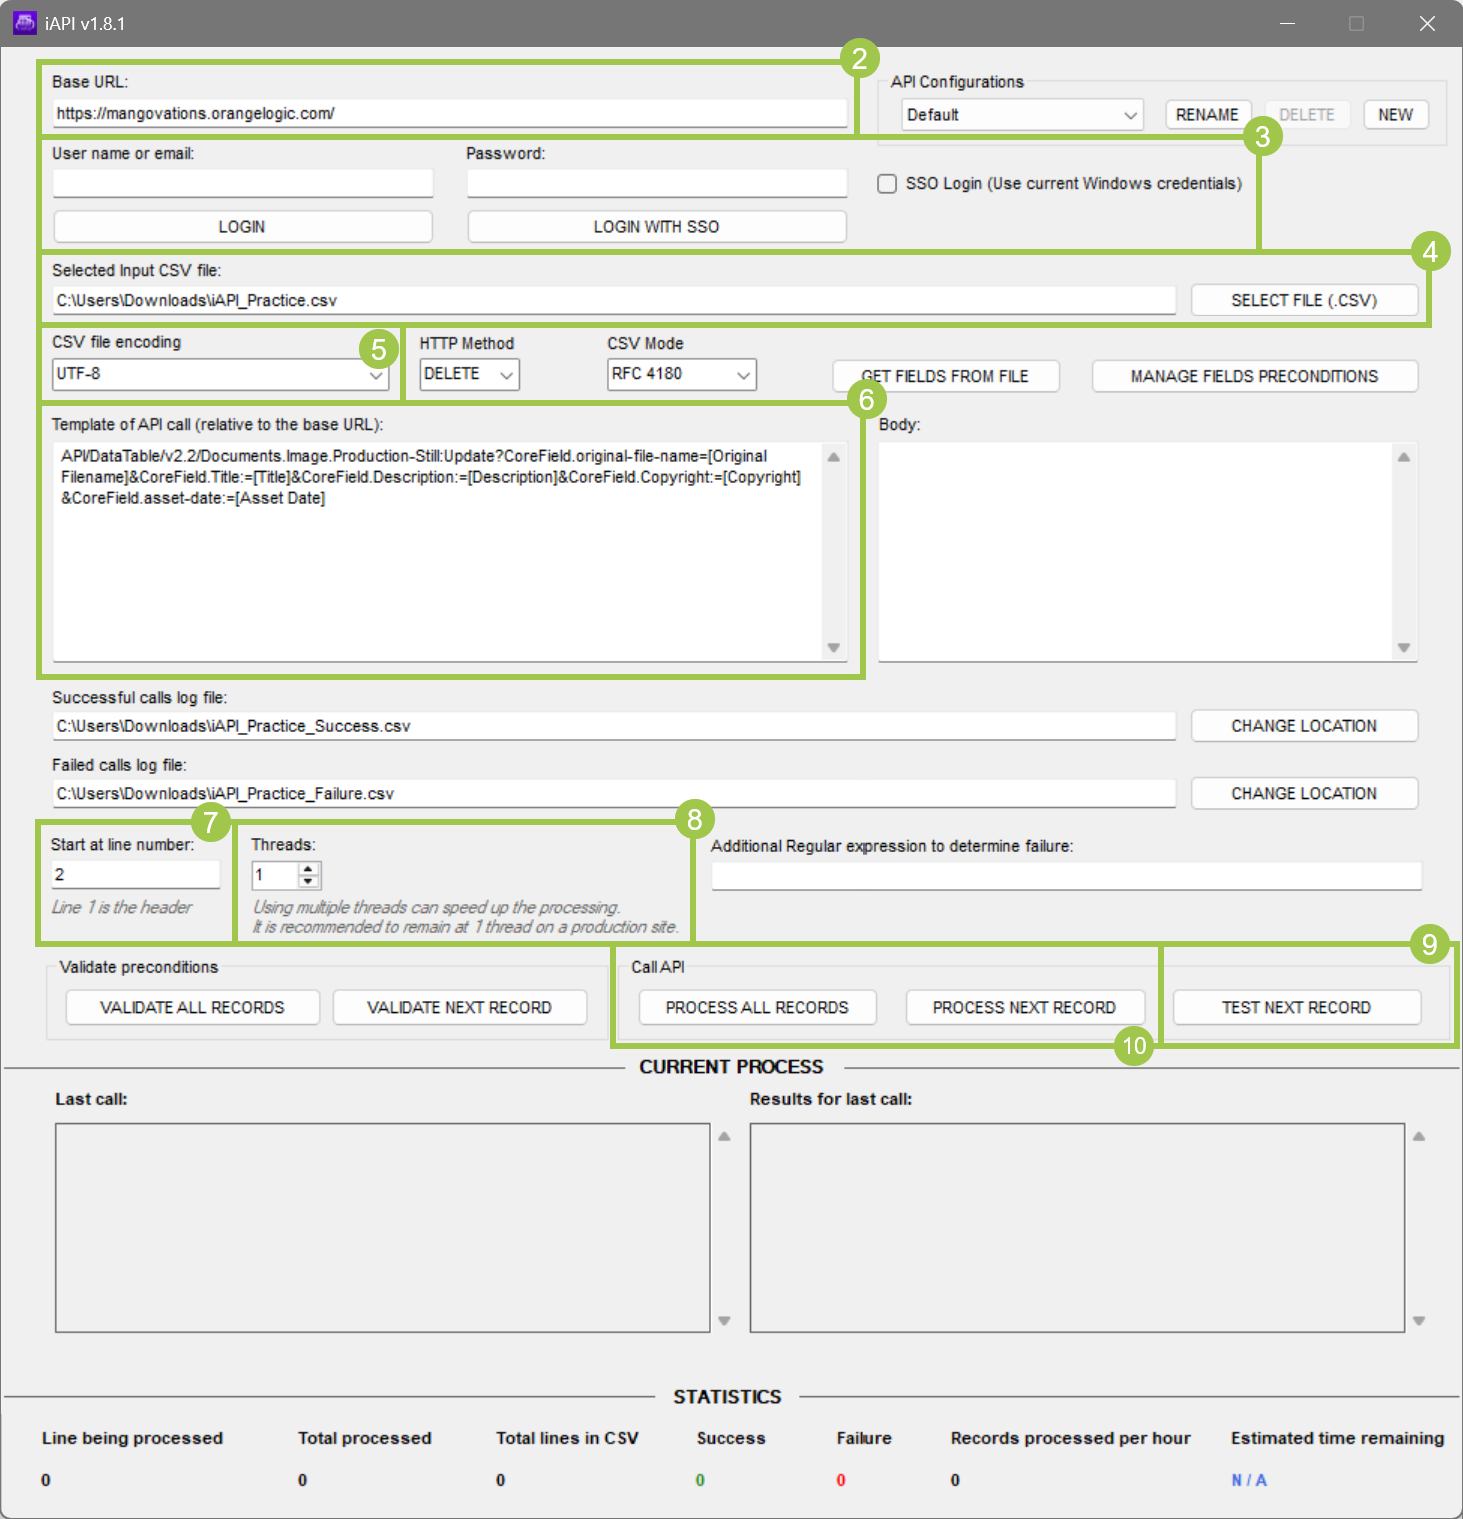
Example: Basic iAPI workflow
Open iAPI.
Enter your Orange Logic URL.
Authenticate by entering your username and password or by logging in with SSO.
Attach your CSV file.
Select the CSV encoding format.
Enter an API call.
Enter the row number of the data you want to process first. By default, the line is 2 because line 1 is the header.
Click Test Next Record to test the call.
If the test was successful, process the CSV file. If the test was not successful, check out these tips and troubleshooting recommendations.
Process a CSV File
Base URL
Enter the URL of your Orange Logic environment in the Base URL field. The URL must include the https:// prefix. We recommend you copy the full address directly from the browser window to ensure this URL is correct.
Authentication options
To make API calls with iAPI, you must be logged in to your Orange Logic environment. There are several methods to log in:
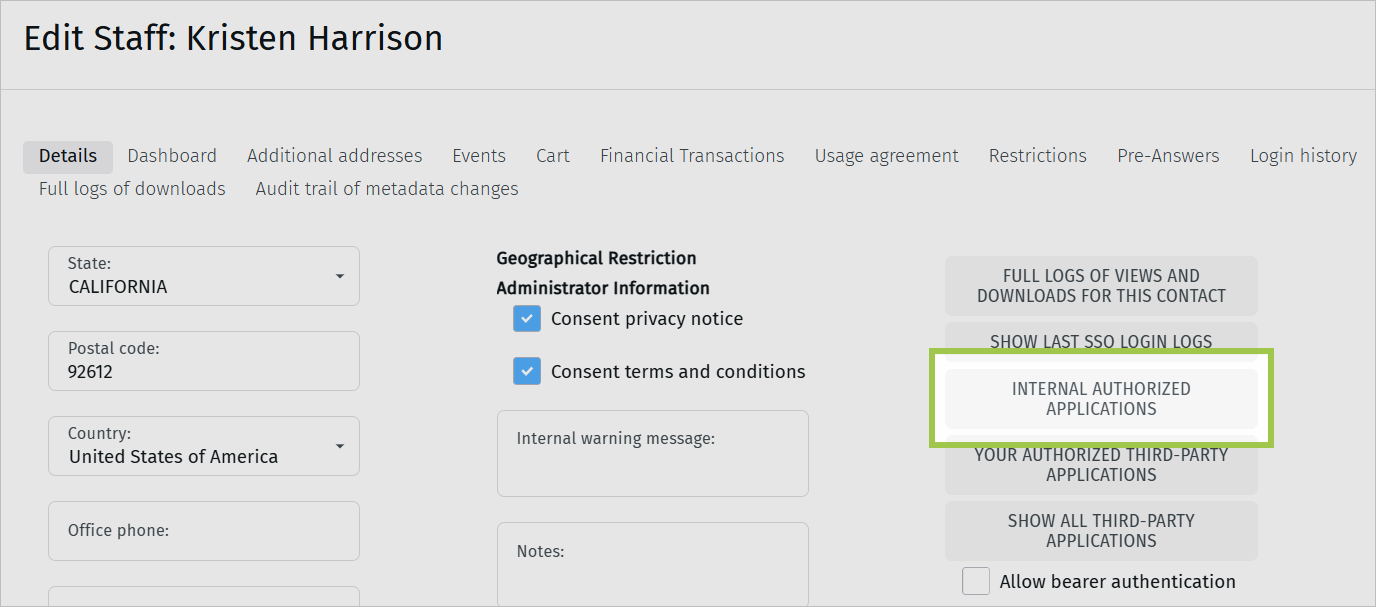
Orange Logic administrators working in the Orange Logic interface can verify that a user has authorized iAPI, and remove the authorization if needed, by opening the user’s account and clicking Internal authorized applications.
Internal authorized applications
Log in with your Orange Logic credentials
Your credentials in iAPI are the same as your credentials for the Orange Logic interface.
Orange Logic credentials login
If you are unable to log in, verify that you entered a valid, secure link in the Base URL field.
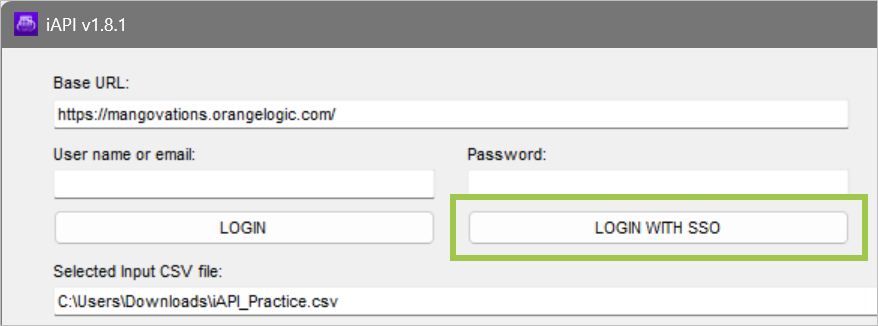
Log in with SSO
If you use SSO to log in to the Orange Logic interface, click Login with SSO.
Login with SSO
You’ll be redirected to the Orange Logic login page in your browser (if you’re not already logged in) and then to a page where you can authorize iAPI access to your environment.
Authorize iAPI
Log in with your Windows credentials
If you use the same SSO credentials for your Windows computer and Orange Logic, select the SSO Login (Use current Windows credentials) checkbox to automatically populate the User name or email and Password fields. Then click Login.
Windows SSO login
Select your CSV file
Before you run an API call, you must upload the CSV file that contains the data you want to ingest.
Click Select file to upload a CSV. To switch from one CSV to another, close and reopen iAPI.
See our tips and troubleshooting recommendations for details on which characters are allowed in iAPI CSV files.
Select file (.CSV)
💡
Tip
Remember to review all your settings when you change from one CSV to another. When you run a call on a new set of data, verify details such as the placeholders in your call and the starting row , and be sure to test a few rows.
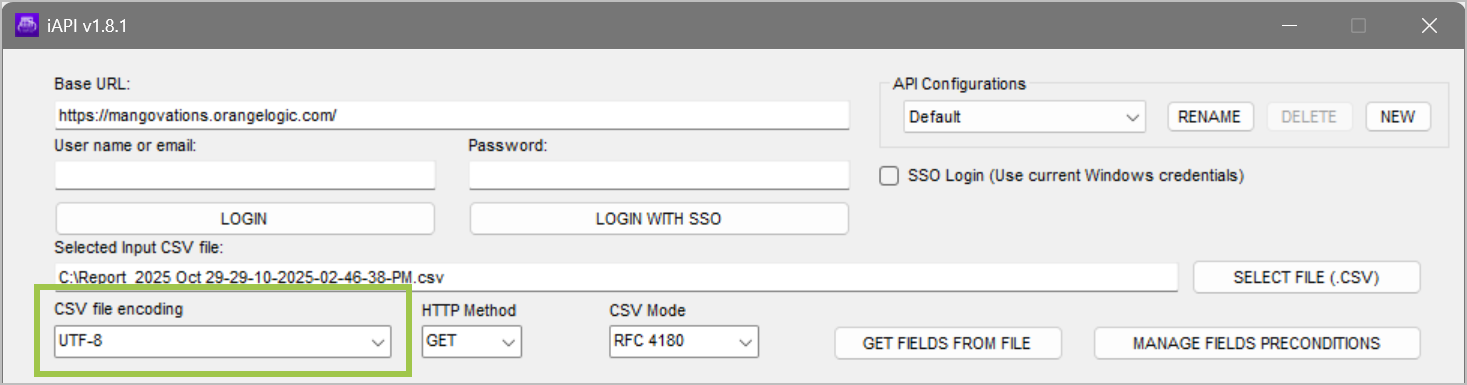
Specify CSV file encoding
Choose the encoding method that matches the CSV file you uploaded. If your encoding selection doesn’t match the encoding of your file, your data might not import correctly. For example, characters not used in the standard Latin-script alphabet might be imported as symbols or special characters (!@#$%^&*) might not be rendered correctly.
CSV file encoding
💡
Tip
Some applications allow you to select an encoding method when you save a file as a CSV. By default, Google Sheets files use UTF-8 encoding. Microsoft Excel 2014 and later version files also use ANSI encoding. Microsoft Excel 2013 and earlier version files use ANSI encoding.
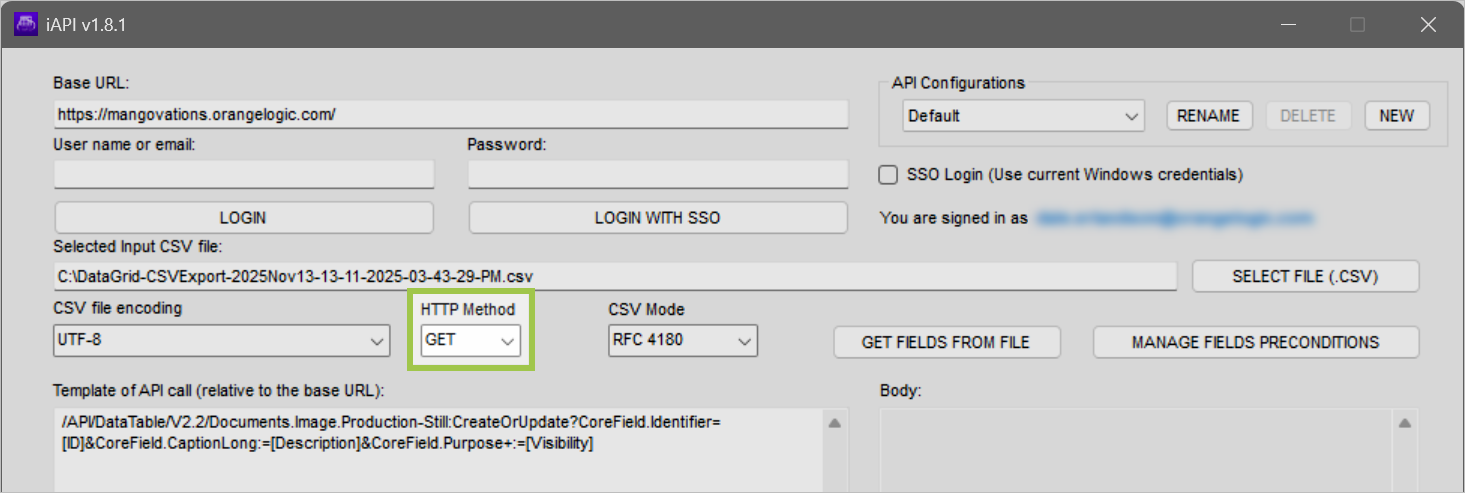
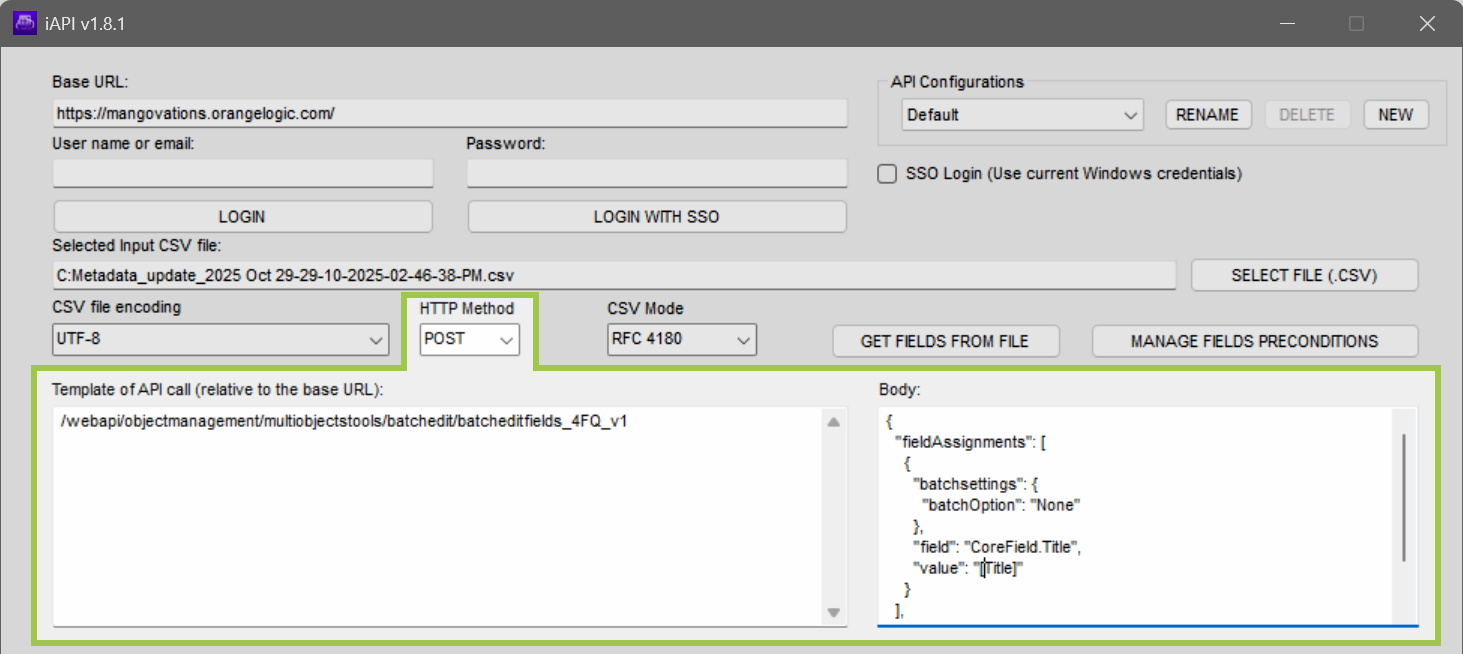
Specify an HTTP method
Select the method of your call in the HTTP Method field. You’ll most frequently use GET for DataTable calls and POST for /webapi/ calls.
HTTP Method
ℹ️
Note
Many Orange Logic APIs can be run as GET or POST calls. You might find running GET calls directly in your browser convenient for testing.
However, be aware that there is a character limit for URLs, which varies by browser. A 403 error might indicate that your call is too long. In this situation, use the POST method to send the values in the body of the call as form data instead of in the URL.
With a POST request, some parameters can be passed either in in the HTTP header or in the URL. If the same parameter is present in both places, the value in the HTTP header overrides the URL.
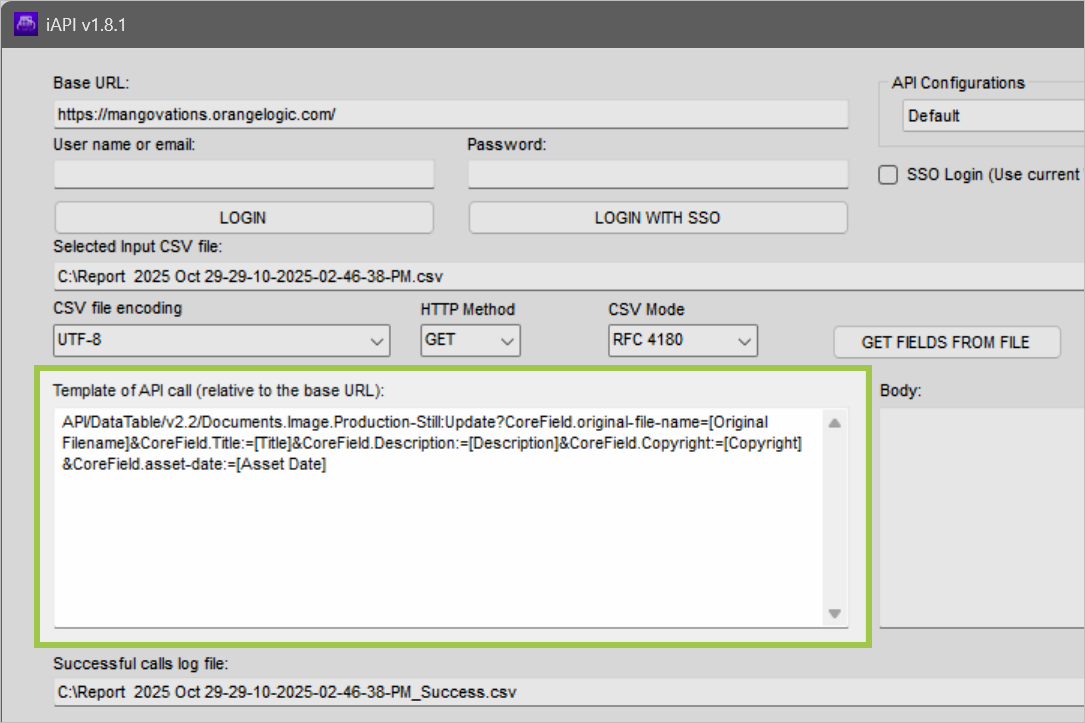
Enter an API call
Enter the API call in the Template of API Call (Relative to the Base URL) field. Omit the base URL. For example, if your base URL is https://mangvations.orangelogic.com/, omit the base and enter the rest of the call, which usually begins with /API/.
If you’re running a DataTable call, the call must follow the DataTable API syntax.
A DataTable call in iAPI
If you’re running a /webapi/ or DataTable call with the POST method, enter the URL slug in the template field, and then enter the body of your call in the Body field, using JSON formatting.
A /webapi/ call in iAPI
💡
Tip
You can copy the URL slug and build a JSON body in Swagger , and then paste both pieces of information in iAPI.
Use placeholders
In your call, replace specific object or metadata information with placeholders that reference the column headers in your CSV.
💭
Example
For example, you could use the following DataTable call structure to add tags to standard image assets:
This call would update the asset with the identifier ZZ12PAR by adding the tags “Seine river,” “Eiffel Tower,” and “France.”
To run this call in iAPI to update a set of assets you’ve identified in a CSV file, you would replace the information in curly brackets with placeholders that correspond to the column headers in your CSV file, like this:
This call would update every asset with an identifier in the “Asset ID” column of the selected CSV by adding the values in the “Tags” column of the same row.
You can type your placeholders directly into your call. However, to ensure that what you enter matches your CSV file and is correctly recognized by iAPI, we recommend the following procedure:
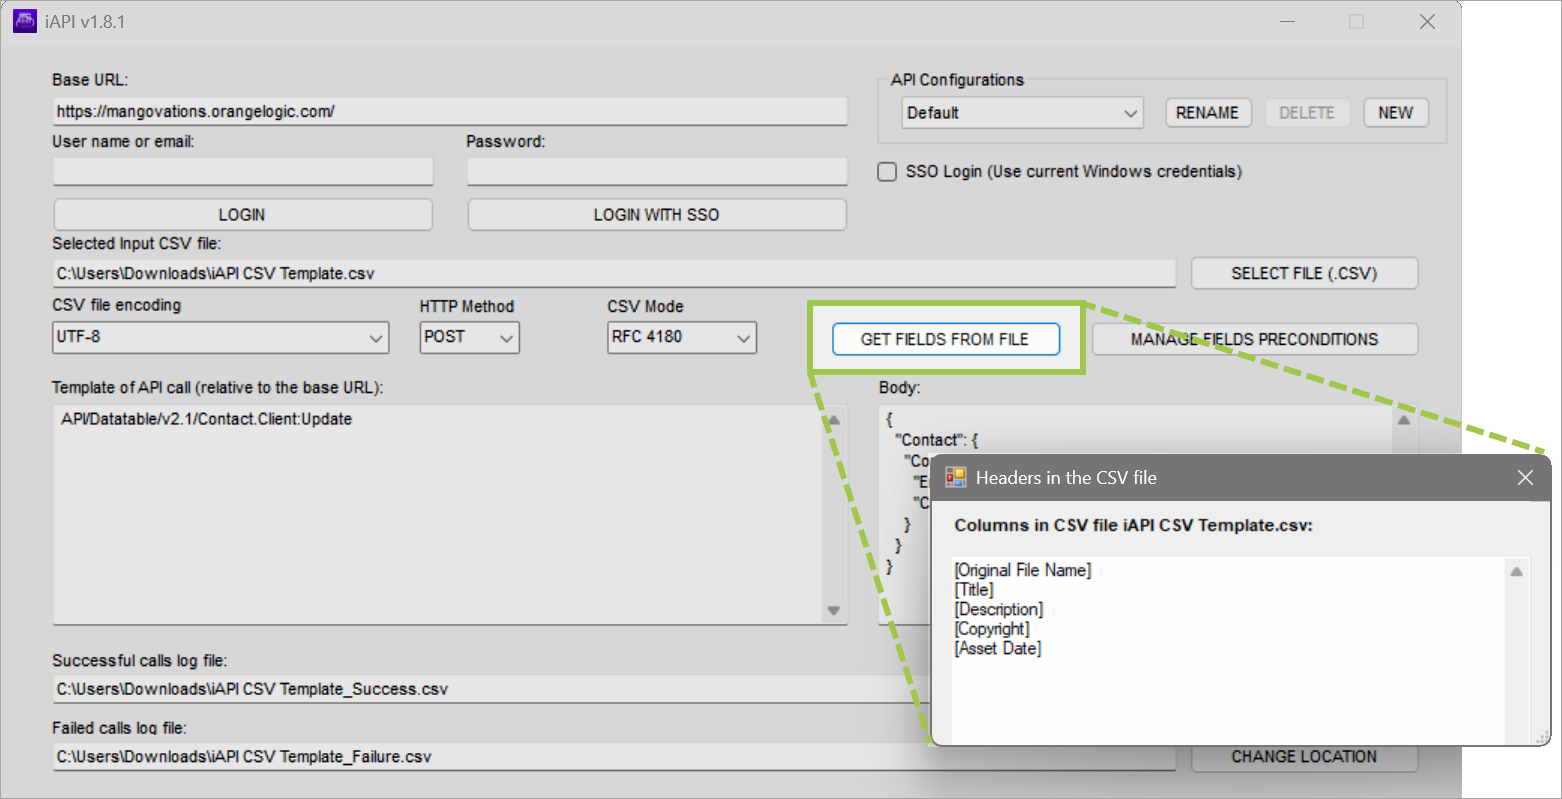
Click Get fields from file.
Copy the column header shown in the Headers in the CSV file window.
Paste the column header into your call, including the square brackets.
If the column name doesn’t appear in the Headers in the CSV file window, iAPI doesn’t recognize the header.
Get fields from file
When you use iAPI for non-DataTable calls and use the POST, PUT, PATCH, or DELETE methods, you must use both the template and body fields. Enter the URL slug in the template field, and then enter the body of your call in the body field, using JSON formatting and using the column headers of your CSV file as placeholders.
Configure log files
You can change the location of the success and failure log files by entering a new path or clicking Change location. You can also update the names of these files if you have a preferred naming convention.
These files can help you audit the changes that have been made or, when a call fails, help you understand what went wrong and troubleshoot the issue.
Log file locations
When you run very large batches of calls (such as one million or more), the resulting success and failure log files will be lengthy. In this scenario, iAPI automatically splits the logs into multiple files limited to 75mb each. This behavior ensures you can open the files in Microsoft Excel or Windows Notepad and won’t exceed any file size limits.
If your call logs require more than one success or failure log file, each file name is appended with a number. For example, you might have the following files:
Report 2026 Aug 14 _Failure.csv
Report 2026 Aug 14 _Failure_1.csv
Report 2026 Aug 14 _Failure_2.csv
Report 2026 Aug 14 _Success.csv
Report 2026 Aug 14 _Success_1.csv
Report 2026 Aug 14 _Success_2.csv
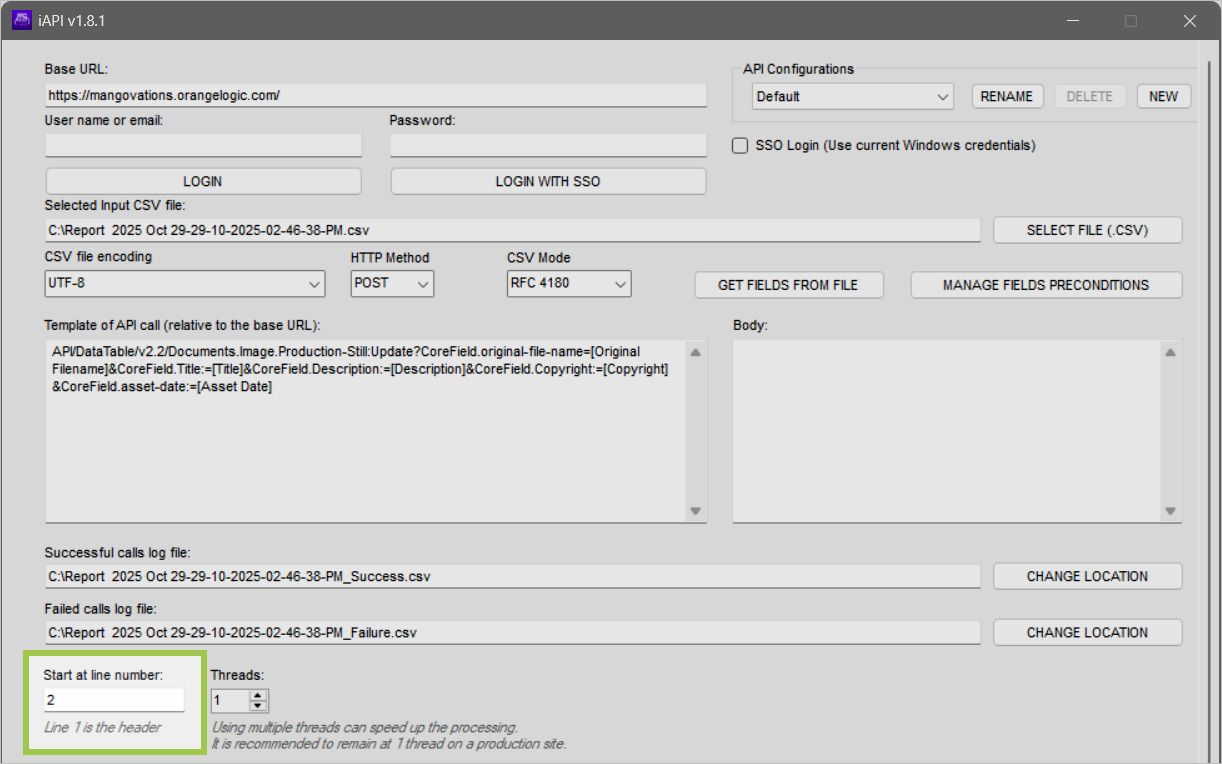
Select a starting row
Select which row in the CSV file you want the API call to start with by entering a row number in the Start at Line Number field. The first line of the CSV file is the header so, by default, the call starts with line 2.
Start at line number field
Use the starting line setting to test your call on specific rows of data before you run the call on your entire CSV file. If the rows in your CSV file are significantly different (for example, if you have rows for different types of assets), use this setting to test each type of row and verify that data is processed as you expect in each unique circumstance.
💡
Tip
We recommend working with CSV files that are limited to a particular type of data. For example, you might want different files for different asset types or subtypes, or you might want different files for different parts of the folder hierarchy. This approach can minimize the risk of unintended changes. It also means you'll run many individual calls to process all the data spread across multiple files.
Alternatively, you can work with a single large CSV file that collects all the data you need to update. This approach requires more thorough testing, but it also means you can start a single call and let it run unattended for a long period of time while it processes a large amount of data.
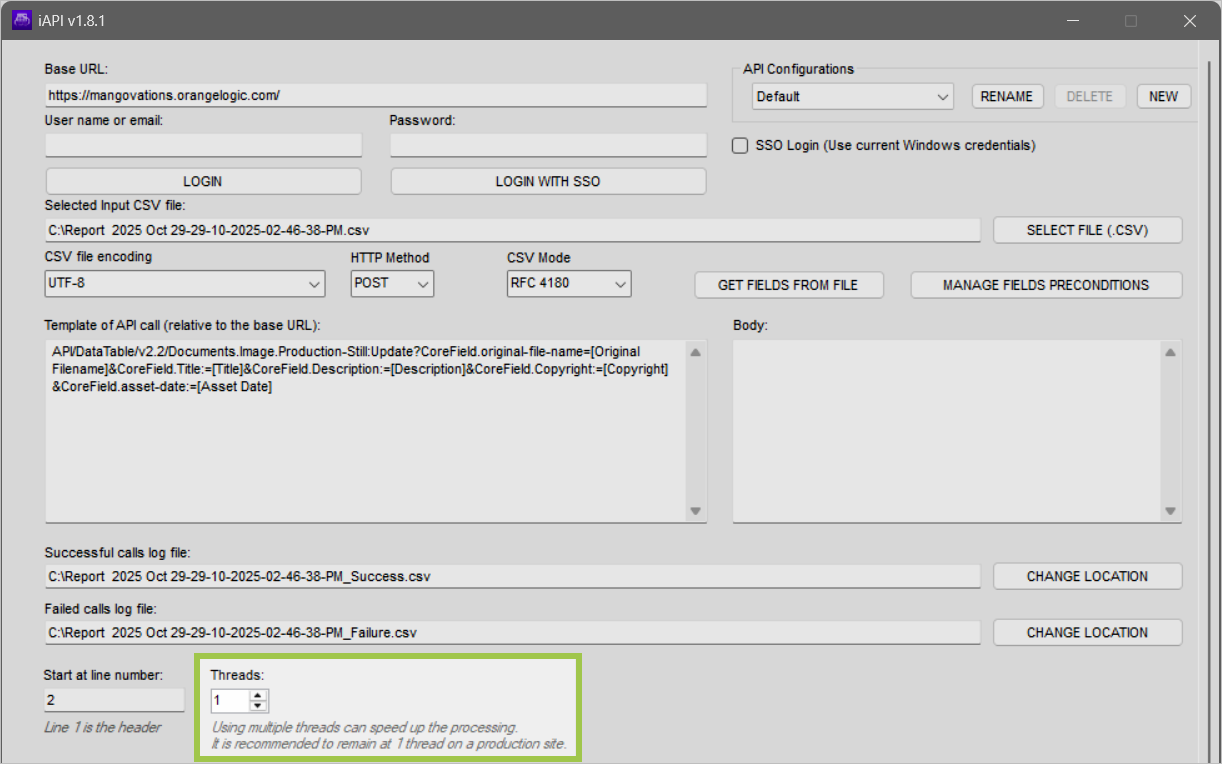
Specify a number of threads
Threads determine how many rows of data iAPI processes simultaneously. You can run up to four threads, meaning iAPI processes four rows of data at the same time. Increasing the number of threads can reduce processing time when you’re running a call on a large batch of data in your test environment.
⚠️
Caution
Using multiple threads can speed up the processing of your call, but it can also impact the performance of your Orange Logic environment, particularly if there are many active users. We recommend using multiple threads only in test environments.
Threads field
ℹ️
Note
When you use multiple threads, the row numbers in success and failure logs might not be sequential. For example, when iAPI processes three rows at a time, row 7 might be processed before row 3. The logs still provide an accurate summary of which records were successfully processed and any issues that prevented processing.
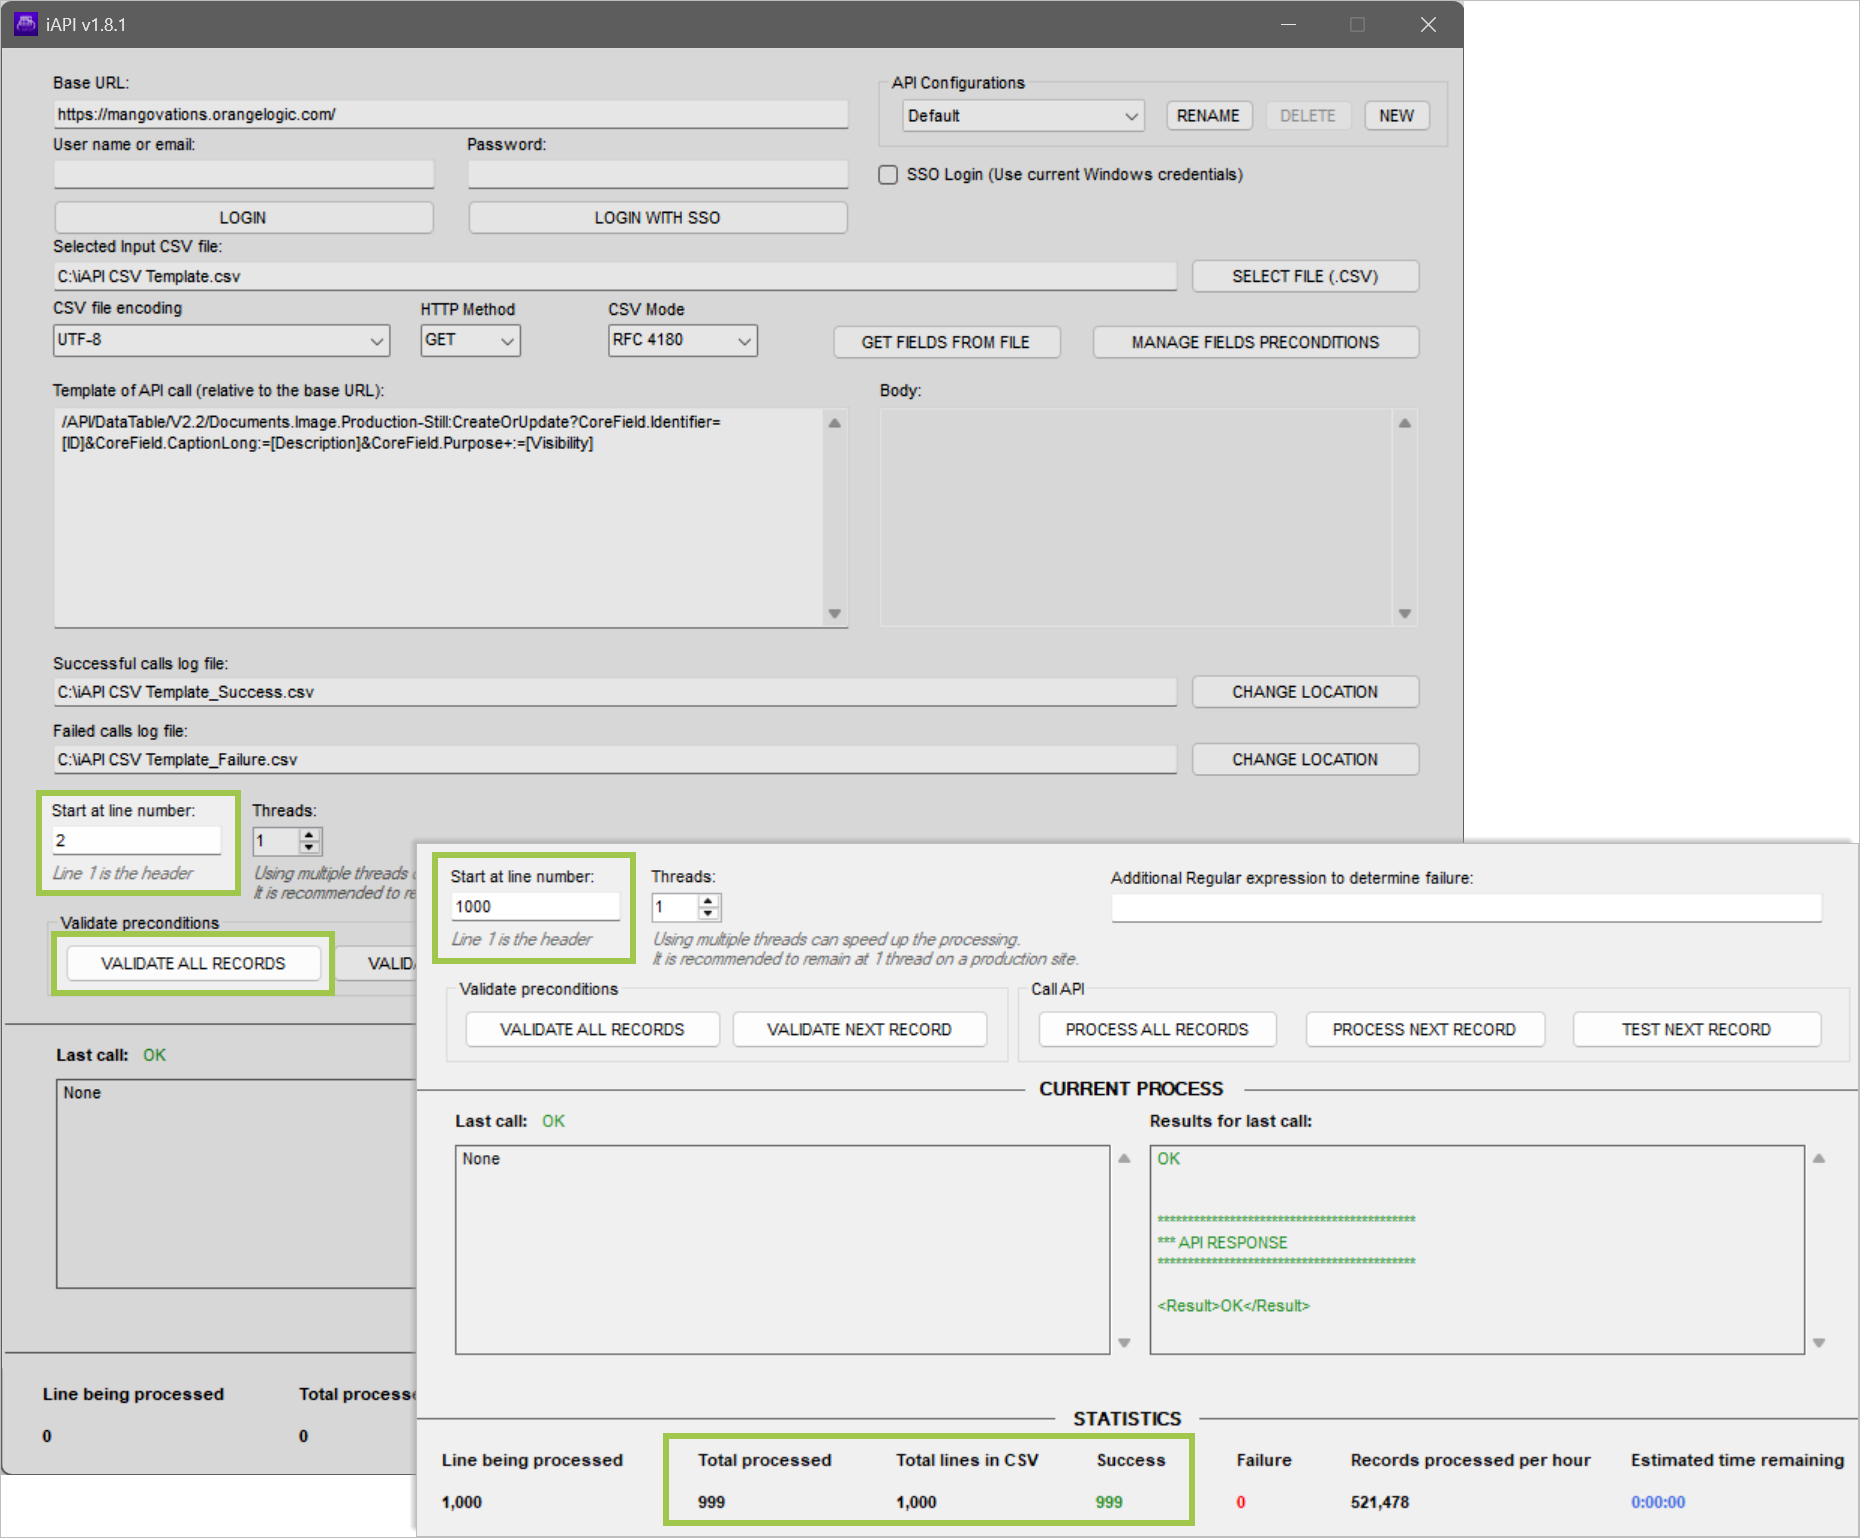
Validate your configuration
When your configuration is complete, you can validate your setup. This step doesn’t guarantee that your call will be successful or that all your data will be correctly processed. Validation simply confirms that iAPI can correctly identify the objects you intend to update.
Click Validate next record to validate a single row in the CSV. iAPI starts with the row you specify and moves to the next row each time you click this button.
Click Validate all records to validate every row in the CSV. iAPI shows the number of records successfully identified.
Validating records advances the start line and shows how many records were successfully identified
Run a call
You have several options to start running a call:
Process all records: Run the call and process all the data in the CSV file.
Process next record: Run the call on a single row of data in the CSV file. iAPI starts with the row you specify and moves to the next row each time you click this button. Use this option to verify your configuration before running the call on all of your data.
Test next record: Run the call on a single row of data in the CSV file. The changes are immediately rolled back. Use this option to identify any errors without making any changes in your Orange Logic environment. We highly recommend you thoroughly test your calls. Always test at least one record before processing a whole CSV file.
Run a call in iAPI
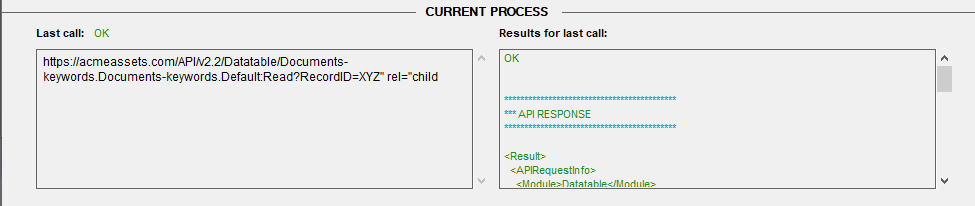
Review the status of a call
Details of a call being processed appear at the bottom of the iAPI window.
Last Call: The URL of the call currently being processed. You can copy the call and run it directly in your web browser to see details, including values populated and error messages.
Results For Last Call: The response to the call most recently processed. You can copy and paste this content into a text document to easily search for errors.
Successful call details in iAPI
The bottom of the iAPI window also shows the following information:
Line being processed: The row of the CSV file that is currently being processed.
Total processed: The number of rows that have been processed by the current call.
Total lines in CSV: The total number of rows that need to be processed by the current call.
Success: The number of rows that were successfully processed.
Failure: The number of rows that failed to process.
Records processed per hour: The average number of database objects processed per hour by the current call.
Estimated time remaining: The approximate time it will take the current call to finish running.